return link

Monday, 13 July 2026

 This is a copy of a post I made to Facebook.

YASHICA FX-A

Now here's something you may not have seen before, or ever see again, it's the rarest of Yashica SLRs, the FX-A.

There's not much information around about the FX-A. It was introduced at Photokina in 1982 but the plug was pulled on the project soon after and there was only, allegedly, around 1000 made, most of which, allegedly, were bought by the US Government. I'm not sure any of this can be verified but it's a fact that few were made and they rarely show up for sale.

The FX-A has built-in focus-assist so is a predecessor of the later Contax RX. It is not auto-focus and I, personally, can't see how it could ever have been an auto-focus camera as there are no couplings to the lens that would allow the lens to be controlled by the body. I think this was only ever going to be a focus-assist system, just like the RX. At the same time, Yashica were developing a AF version of the Contax 137 which may have been a full auto-focus system - we'll never know.

The FX-A has been described as similar to the FX-D. In fact it has very little similarity to the FX-D and it would be misleading to say it is. It is a generation later than the FX-D and the style and build are much more similar to the FX-70 and the FX-103. Both of these cameras came later so it seems some of the development of the FX-A did not go unused and appeared in these later cameras. The shutter, particularly, is different than the FX-D or any earlier cameras but the same shutter was carried over into the FX-70 and FX-103. Other parts and assemblies also got reused in the later cameras.

If I am being perfectly honest, the FX-A, along with the FX-70 and FX-103, are not built as well as the FX-D. Maybe this was the result of cost cutting measures, perhaps due to Yashica's financial woes of the time prior to the Kyocera take-over.

It seems the camera was intended to have a number of accessories including a winder and a data (or date) back. There are four winder contacts on the base suggesting the winder would be based on the Contax 159 winder which also has four contacts. But one of the contacts on the FX-A is not connected so it would have had less functionality. The Contax 139 winder fits and works as intended. The later FX-103 also had four contacts and a winder which looks identical to the Contax 139 winder so this was probably what was intended for the FX-A. The 139 winder only needs two contacts though so I don't know why they included more.

The camera has a data back LED to trigger the data back each time the shutter is released. So a data back was planned. This eventually appeared with the FX-103.

Other functions include a flash ready contact in the hot shoe. This works with the Contax TLA20 but I've not checked it with any other flash models. There is no TTL flash. This was introduced with the FX-103.

There is also a self timer switch on the front of the camera which also provides a momentary exposure lock.

There is one thing about the camera I have failed to understand. At the top of the lens mount is a switch which is activated by the lens maximum aperture tab. Normally this tab tells the body the maximum aperture of the lens which it uses for displaying the aperture in use. But the FX-A doesn't display the aperture and, what's more, this is just a switch, not a variable resistance or a digital encoder as is found on other bodies to indicate the aperture. So what this switch was intended for I don't know. It just seems to tell the body that a lens has been attached and no more.

My example of the FX-A appeared recently on ebay. I was lucky. It had only just been put on when I saw it. The buy-it-now button has never been pressed so fast. There was no information other than it was untested so I expected it not to work. But on inspection it powered-up and the lights came on, including the focus indicators, but the shutter wouldn't fire. I also noted the mirror had slipped. Two common problems with Yashica SLRs. Having fixed these problems many times in the past on other Yashica (and Contax) models, I had no hesitation to attempt repairing the camera albeit knowing there would be some differences. The main difference, of course, is the additional modules and circuitry for the focus assist. This has caused the flexible circuit board to be enlarged and increased in complexity which makes removal, required to enable the camera to be dismantled, somewhat more complex and time consuming. Overall I spent nearly two days repairing and servicing the camera. The camera now works as intended and has also had a full service carried out.

The leatherette covers on the camera were perished as usually happens. Strangely, the cover around the grip is rubber and was in perfect order. I've replaced the other covers with some I had and have fitted a rubber thumb grip to the back which I think compliments the front grip quite well.

The focus-assist works well in good light with a contrasty subject. But it becomes less reliable as brightness and contrast reduces. There are no other focus aids in the viewfinder so you either rely on the focus assist or use the matt area of the screen to focus.

The FX-A is now a collectors item. I don't see this as a users camera. It's quirky and interesting to use (once) but will then sit on the shelf I'm sure. I'm not really a collector so if anyone is interested in becoming the owner of this FX-A, make me an offer. It will have to be a good one though.

I've attached a selection of photos taken during the repair for anyone interested in the internals.


Wednesday, 1 July 2026

Monday, 23 March 2026

Is your mirror staying up?

 I've seen a few discussions about this recently and the suggested reasons and solutions show a lack of understanding of general principles. So here's a few reasons of why a mirror may stay up.

1. Mirror is stuck to the mirror foam.

This is a myth, often repeated but, I imagine, never actually seen. I've never seen it in the hundreds of cameras I've repaired. Even ones with very sticky foam, I've never seen a mirror actually stuck to it. Let's move on.

2. Mirror hits the back of the lens.

If the mirror slips down in the mirror carrier such that the bottom of the mirror overhangs the carrier, it 'might' hit the back of the lens. It depends on how much the mirror has slipped and how far the lens protrudes into the camera. It may happen with some lenses and not with others. It may happen with some lenses only if they are focussed on, or near, infinity as the lens moves further away form the mirror as it is focused closer.

There are two possible scenarios if the mirror hits the back of the lens depending on how high the mirror gets before getting stuck. 

a) If the mirror rises sufficiantly for the shutter to fire, the shutter will open and close normally but the mirror will not fall after the shutter closes. The camera can be cocked again but the mirror will remain up.

b) If the mirror rises insufficiently for the shutter to fire, the shutter will remain cocked and no exposure made. The camera will become locked.

In both cases, the camera works normally if no lens is fitted.

3. Shutter fails to close.

The closing of the shutter triggers the release of the mirror. If the shutter fails to fully close, the return of the mirror doesn't get triggered and it stays up. The camera, usually, can be cocked again and the mirror will typically return back to the down position.

Depending on the camera and the type of shutter, sometimes the shutter can be pushed to make it close fully and the mirror will then fall. Try this at your own risk.

Wednesday, 23 July 2025

Comments now moderated

Due to a number of spam comments that have been made recently, all comments on this blog are now moderated which means they will be checked for content prior to being approved. So, to the spammers, don't bother because you will be wasting your time posting comments here.

Sunday, 5 January 2025

Contax S2 shutter adjustment

I was reminded recently of a post I made, some years ago, on Rangefinder Forum describing the adjustment of the Nikon FM2 shutter (later used in the S2). I thought posting it here might be a good idea. It's been edited from the original to remove the Nikon references and change a few specifics based on more recent experience.

Note: Some of the pictures are of other, similar, shutters so may not be exactly as the S2 shutter but they serve to show specific features.

The S2 shutter is a mechanical shutter with speeds from 1 sec. to 1/4000 sec. plus B. The shutter was made by Copal and is a variant of the Copal square shutter.

The shutter curtains are timed by a cam rotating around a shaft driven by a spring. The spring has a small amount of adjustment to its tension. The position of the cam at which the second curtain is released is fixed but the position at which the first curtain is released is moved when changing speeds. This is the only method used to adjust between the top four speeds (1/500 - 1/4000 sec.). slower speeds use an escapement and a number of linkages to hinder the rotation of the cam and so decrease the shutter speed. The two curtains are driven by individual springs each with its own tensioner. Once the curtains are released, they travel independently and have no interaction.

As mentioned, the main spring has some adjustment which will cause the main shaft to rotate more or less quickly. This affects all shutter speeds but the affect is mostly to the slow speeds with minimal affect to the high speeds.

There is an adjustment that alters the timing between the release of the first and second curtains. This affects the high speeds with no affect to the slow speeds.

The curtain tensions can also be altered to increase or decrease the travel time but this isn't recommended.

Adjustments can be made with the shutter in-situ but the high speed adjustment is easier with the shutter removed from the camera. Note that the mirror box of the camera needs to be removed to access the high speed adjustment. 

Image 1 shows the main operating levers that cock and trip the shutter.

Image 2 shows the location of the adjustments.

Image 3 shows the location of the curtain springs and the slow speed escapement.


Check all the speeds before making any adjustments. Only adjust what is necessary which is usually just the high speeds.

If you need to, adjust the slow speeds first then the high speeds. Note that this is a mechanical shutter and the speeds will not be perfect. It's quite typical for the top speed to be a little slow. All the speeds should be checked after each adjustment and some compromise may be necessary to get all speeds to within acceptable limits. Note that the 1/250th always runs slow to ensure flash synchronisation is acquired.

The main shaft has a disk attached to the top with a number of slots in it. The end of the main spring sits in one of these slots. See image 4. To adjust the slow speeds, move the end of the main spring to a different slot to either increase or decrease the tension as required. I've found the fingers forming the slots get pinched together by the factory to stop the spring end from slipping out so the fingers need straightening first to allow the spring to be moved. A flat bladed screwdriver pushed between the fingers usually does it. BEFORE moving the spring, wedge the tip of a screwdriver behind the spring end so that, if it slips out of the slot or you lose your grip on it, it won't fully unwind.


Note: The disk on the top of the main shaft that has the slots in it has a slotted hole that fits over a matching raised part on the end of the shaft. In theory, it would be possible to remove the disk and refit it turned by 180 degrees. See image 5. This would allow the spring to be tensioned an extra half-turn. I've never had to do that but if a spring was particularly weak, it might be a solution. The screw holding the disk in place is left hand threaded so turn clockwise to unscrew.

To adjust the high speeds, identify the high speed adjuster. See image below. It looks like the head of a screw with a slot in it but it's only visible side-on and the slot may not be facing you so may not be visible. Because it's not possible to engage a screwdriver in the slot in the normal way, it's necessary to use the tip of a flat bladed screwdriver pushed sideways into the slot to turn it.


If the slot isn't facing you then you need a screwdriver with the tip bent 90 degrees to get into the slot.  Note that, usually, only a very small movement is required.


Just to reiterate, check all the high speeds after adjusting the high speed adjuster and check all the slow speeds after adjusting the main spring as a compromise may need to be made. The below image shows the typical speeds after adjustment. I fire the shutter multiple times at each speed and plot the highest and lowest values to check for consistency. This was a good shutter - you may not get the speeds this close to ideal. But they should be within the upper and lower limits (red and green lines). Note that 1/250th (flash sync speed) has it's tolerance all on the over-exposure side because, if it runs high (under-exposure) then cut-off may happen when using flash.


Monday, 6 March 2023

Body Caps

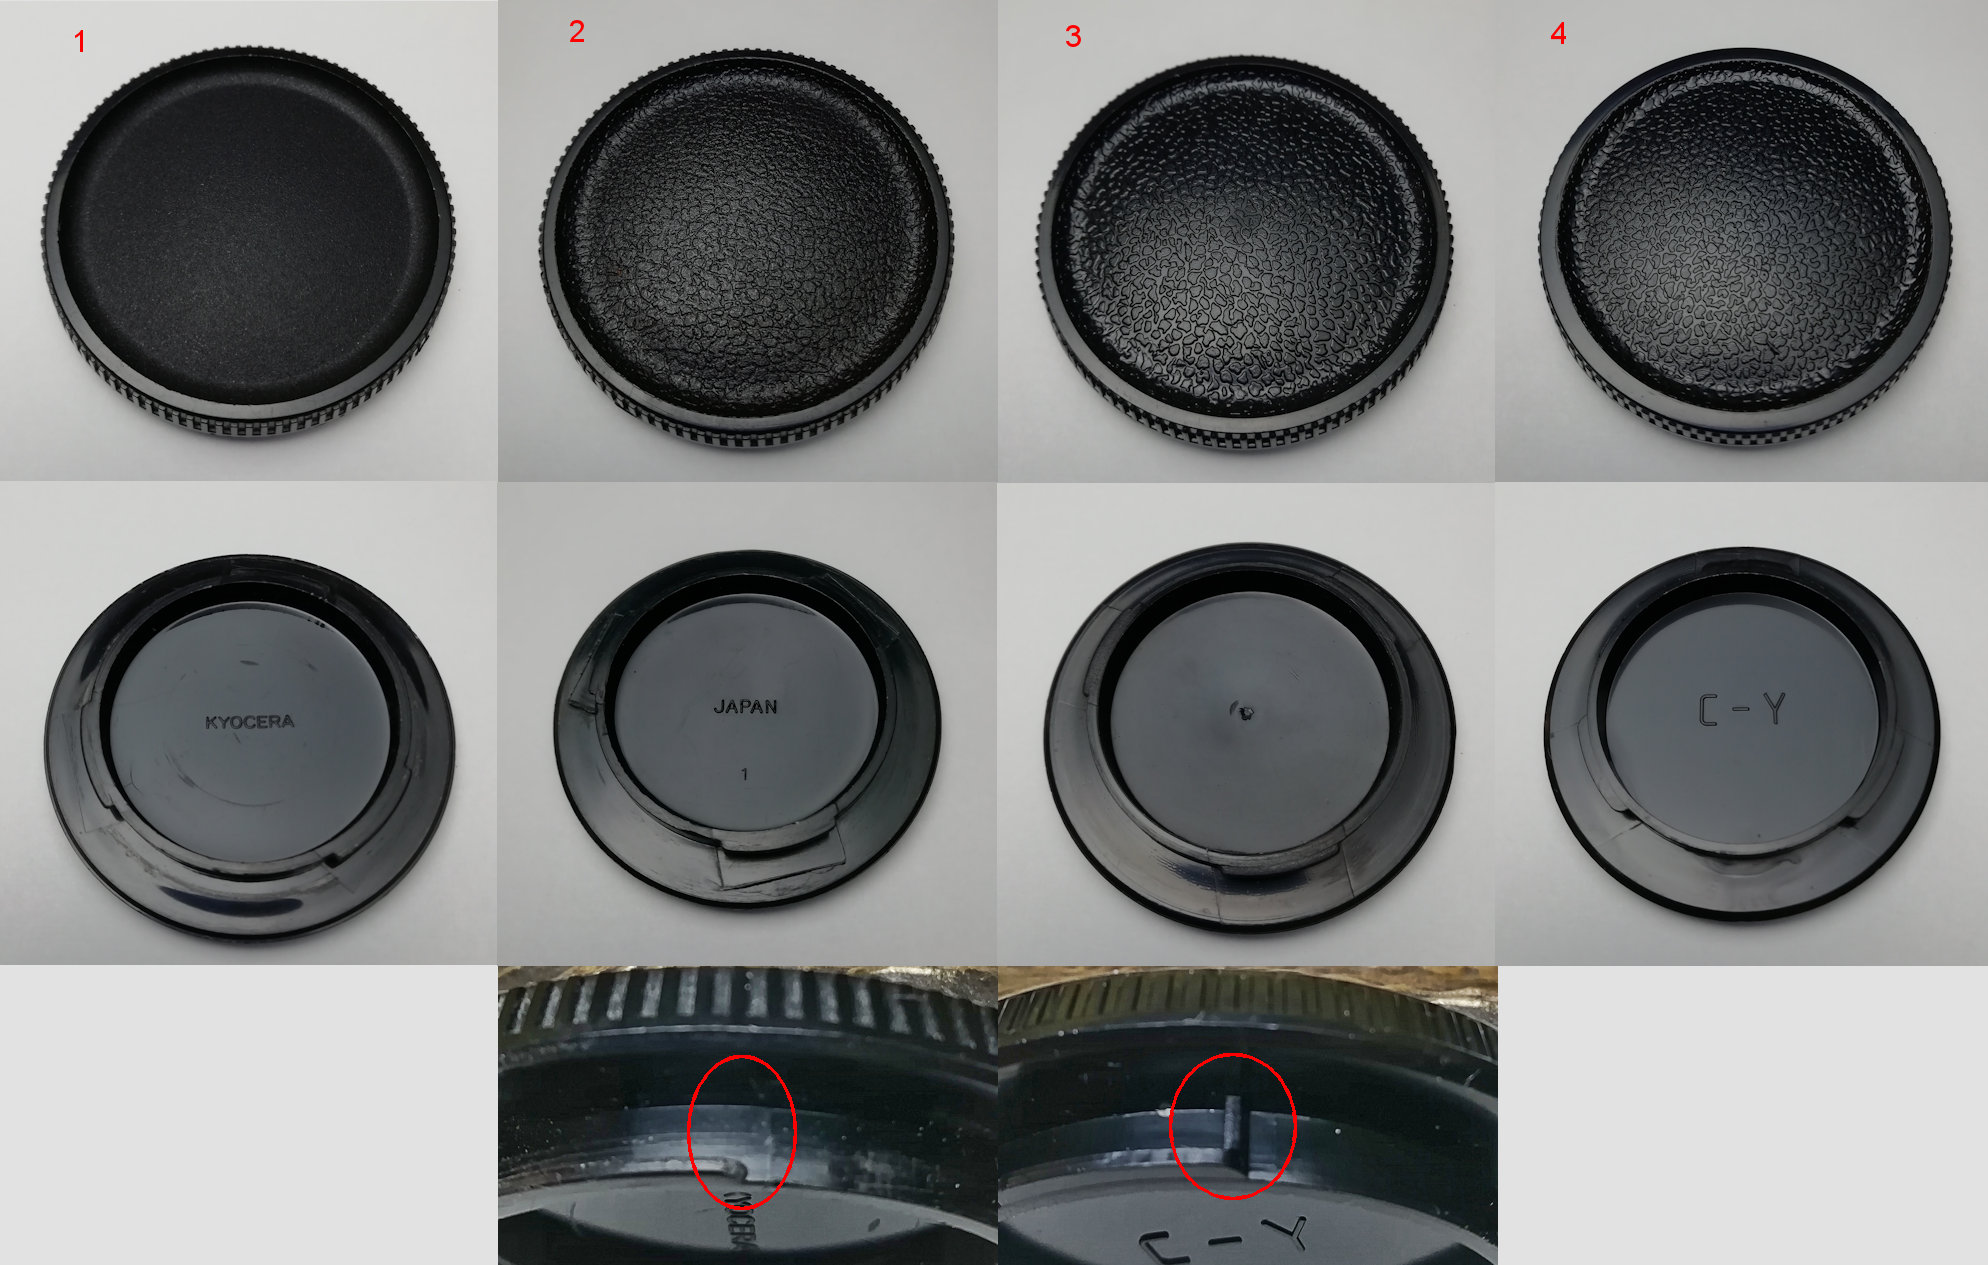
Who knew body caps could be so interesting? I noticed I had four different types of body caps. They are:

1. From a later, Kyocera made, body.
2. From an early, Yashica made, body.
3. From an Aria but not sure if it's original to the camera or not.
4. A (Chinese made?) after market cap.

Besides the differences in the patterning on the front and the text on the back, the way the bayonet is moulded is different on no. 4 to the other three. No. 4 has an extra bit that prevents the cap from fitting properly - it shouldn't be there and I always cut it out when I buy them.

I know 1 and 2 are original equipment, I know 4 isn't. Not sure about 3 though.


Friday, 16 September 2022

My S2 - it's a keeper

 I bought this S2 a while ago - someone had squirted oil into the shutter and had removed and refitted the focus screen incorrectly which caused other problems. I couldn't save the shutter so it was replaced and various other repairs carried out. The interesting thing (to me anyway) is this example has been converted to have average metering like the S2b instead of spot metering. The mask that defines the spot area has been swapped for the mask that is normally in the S2b. Maybe the masks were swapped between a S2b and this S2 or maybe it was done when spare parts were still available and someone acquired and fitted the S2b mask. However it was done, it suits me as I've never liked the spot metering. So I think this one's a keeper.

The covers I've fitted are some fabric covers I'm experimenting with. Also available in blue and black if anyone is interested.


Monday, 22 November 2021

Shutter speeds - before and after service

An example of the difference a service can make to the shutter speeds of a camera - in this case, an RTS II.

Shutter speeds before service:


Shutter speeds after service:

And, although not the sole reason for the slow shutter speeds, this is the dirt, on the end of a slip of paper, removed from the shutter magnet which can cause the magnet to be slow in releasing the second curtain and cause the shutter speeds to be slow and, often, more erratic.


Sunday, 8 August 2021

Replacing the 159 focus screen

The 159 focus screen is not considered user replaceable despite it being fairly easy to remove. The problem is refitting it. In the user manual it says the screen should only be replaced at a service centre and with good reason. If not done correctly the screen will, almost certainly, be damaged. I know, I've done it.

I experimented with an old screen to see if I could find a way the screen could be changed without damaging it. Described here is my method found through that experimentation, it's not a manufacturer recommended way.

Before proceeding a method of holding the screen without damaging it is necessary. Later camera models had screens with a tab to be used to hold the screen by but the 159 screen doesn't have a tab. I use a pair of flat tipped tweezers that have had the tips covered in heat shrink cable insulation. This is permanent and I only use them for this purpose but a temporary solution could be some rubber sleeving fitted over the end of some tweezers.


I also recommend the mirror buffer foam be removed. This makes it easy to see the release catch.

First, the camera needs to held inverted.

Contax 159 screen replacement

A piece of card needs to be cut and bent to fit into the camera such that the edge sits against the back of the focus screen frame (see arrow in next picture). The card will stop the frame jumping out of its retaining slot and will also protect the mirror from possible scratching.


Release the screen by pulling back on the catch. The screen frame will pop up. Lift it up and remove the screen from underneath. This is best done by using something with a point to press against the edge of the screen and lift it up then use the covered tweezers to grab the screen and remove it while holding the frame clear. Don't try and remove the frame first, you will probably scratch the screen while trying to remove the frame.

If you do remove the frame after removing the screen, note it has two tabs on it, a wide one on one side and a narrow one on the other, The wide ones goes to the back, the narrow one to the front.


Refitting is the reverse order to the above. Fit the frame first, hold it clear and fit the screen under it. Note the dull (matte) side of the screen goes towards the prism.


Finally, lower the frame but DO NOT try and press down on it to engage it with the latch.

Use a pair of tweezers to pull the latch back as far as it will go. Use the tweezers against the mirror box frame and make sure the latch is held firmly before going further.


This is the most important part of the process. If the latch isn't held back the frame, which is quite flimsy, will get pushed inwards and will scratch the surface of the screen.

With the latch held back, hold the frame into position then release the latch.

This is not an easy procedure to carry out and requires practice of using two pairs of tweezers and a steady hand.

Sunday, 7 February 2021

Yashica FX-3 Super 4000 part II

Following on from my previous post of the same title. The KF-M1 lingered in pieces for a couple of months until I finally decided to convert it to a Contax/Yashica lens mount. I've converted Phenix made, Yashica based, cameras before but from Pentax K mount to C/Y. That was fairly straight forward and I expected this to be the same - I was wrong. Converting from a Nikon mount to a C/Y mount turned out to be more difficult. The main issues were due to the way the Nikon mount transfers aperture information to the body which meant the metering circuit was different and also due to the shorter flange to film distance and the wider lens mount causing some mechanical differences.

Without going into all the details, essentially, I replaced the KF-M1 mirror box and viewfinder along with the meter circuit with the same from a Yashica FX-3. The increased range of shutter speeds is a slight issue and, as it now stands, the meter doesn't work if the 1/4000 shutter speed is selected. That's not really an issue. I also added a grip, replaced the shutter speed knob as the original was difficult to grip, and fitted new covers. As I replaced the viewfinder and metering system with the same from a Yashica FX-3 Super 2000, I also gained a flash ready signal in the viewfinder though that required the hot shoe to be replaced with one with the extra flash contact.

The shutter speeds were adjusted and the 1/4000 is just within specification but it's clear this shutter is struggling to reach the 1/4000 speed. Some further adjustment might improve it but I decided to leave it as it is. 


The same shutter, used in the Yashica Super 2000, but without the 1/4000 speed, exhibits almost identical characteristics and is already struggling to reach 1/2000. This isn't a match for the shutter used in the Contax S2 though, even that, can struggle to reach 1/4000.

Overall, I'm happy with the result. The camera handles well and with the increased weight of the metal top and bottom plates it feels more solid than a Yashica FX-3. Despite the fact I probably won't give it much use, I think it's a keeper.


Update: Despite my reservations about how much use I might give it, this has become a goto camera for me. I really like the handling of it. It's a bit noisy but it's an easy camera to use.


Canon EOS EF Eyecup will fit Contax and Yashica

The Kyocera F-3 eyecup was used on the Contax S2, 167, Aria and maybe other bodies. It also fits earlier bodies like the 139, 137 and 159 and also Yashica bodies like the FX-3, FX-D, FX-103 etc. I, personally, prefer it to the round eyecups that were used on the earlier Contax and Yashicas.

However, the Kyocera F-3 eyecup has become scarce and when they do become available they are expensive. So I looked for an alternative and found the Canon EOS EF eyecup fits perfectly. It's the same style as the Kyocera F-3 though slightly different in shape. Original Canon eyecups are available and are not expensive but there are Chinese made copies that are available very cheaply on ebay.

The Canon EF eyecup fits Canon EOS 350D, 400D, 450D, 500D, 550D, 600D, 1000D etc. bodies. There are other similar models so, if buying, check it's the correct one.

Here's a few pics of one I bought fitted to a FX-3, a 139 and the KF-M1 mentioned in my previous post.


And a couple of pictures of the eyecup itself.


Saturday, 14 November 2020

Yashica FX-3 Super 4000 anyone?

 I recently acquired a Map KF-M1 camera. Made by Phenix in China using a Yashica FX-3 chassis, it has a Nikon lens mount and a top shutter speed of 1/4000 sec. It's the same camera as the Kenko KF-2N which was clearly an attempt to create a camera with the same specification as the Nikon FM-2n. The Map version was made exclusively for Map Camera in Japan and, unusually, has no branding on it. There was another version called the Phenix DN66 sold in the Chinese domestic market.


I was intrigued how the top shutter speed was achieved. The Nikon FM-2n uses the same Copal shutter as the Contax S2 and I knew that shutter will not physically fit into a Yashica FX-3 chassis - I've tried it. The shutter is larger and has slightly different mounting positions. So, to find out how it was done, I had to get a camera. All the variants are rare and, if you do find one, expensive. But I found a KF-M1 in China. The seller accepted an offer but it still cost me nearly £190 with the import tax paid.

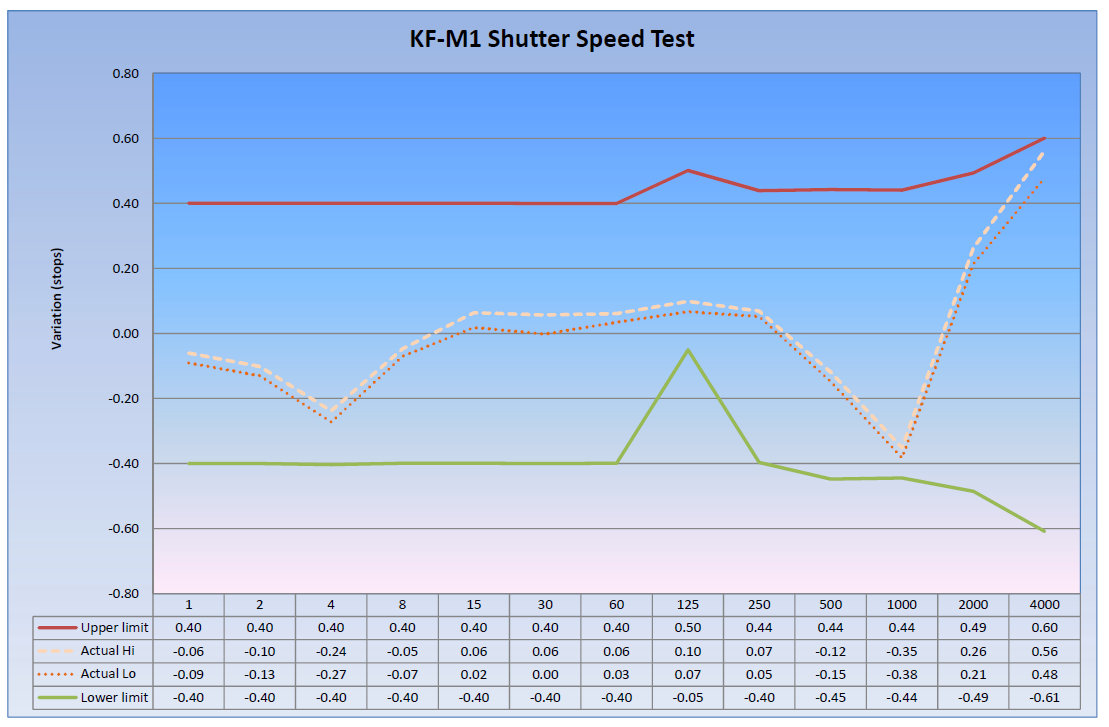
With the camera dismantled, first inspection of the shutter suggested it was the same shutter as is fitted to the Yashica Super 2000 (and many other cameras) but it has an extra position on the shutter speed selector. A check of the shutter speeds shows it is struggling to get to 1/4000 and the general shape of the test results graph is very similar to that from a Yashica Super 2000.

(Note: The upper and lower limits on the above results sheet are from a Contax S2 and are not correct for the KF-M1. They should be the same as the FX-3 limits below.)

It's not unusual for the Yashica Super 2000 shutter to be slow at the top speed but some adjustment will usually bring it into specification. I'll have to see if I can get the KF-M1 shutter closer to what it should be.

So it appears Copal produced a further upgrade to the 2000 shutter, which was itself an upgrade of the original 1000 shutter as used in the original FX-3. So I'm surprised that a Yashica Super 4000 never appeared if the shutter was available and could be fitted with no modification to the existing FX-3 chassis. Maybe it was because it would be competing with the Contax S2.

Now I need to decide what to do with the dismantled KF-M1. I don't want a camera with a Nikon lens mount. I could fit the shutter into an existing FX-3 Super 2000 or I could fit a Yashica lens mount to the KF-M1. The camera is quite well made and, unlike the Yashica with plastic top and bottom plates, the KF-M1 has metal top and bottom. The focus screen is the original Yashica one with the diagonal split prism, which I don't like, but if I change the lens mount I'll also have to change the viewfinder so that's not an issue. Whatever I do, the camera is unlikely to get a lot of use from me so if someone out there has an urge to own a Yashica Super 4000, get in touch and we can discuss.

Update: There is now a part 2 to this post at https://contax139.blogspot.com/2021/02/yashica-fx-3-super-4000-part-ii.html

Sunday, 6 September 2020

Contax 50mm f/1.7 AE/MM differences

I've worked on both AE and MM versions of this lens before but have never done a direct comparison of the two. Recently I had reason to work on one of each at the same time so was able to do some direct comparisons of their construction. I thought it was worth recording what I found.

The two samples I compared had serial numbers 6504056 (AE) and 7380543 (MM). The differences noted may not be the same for all AE or all MM lenses.

Plastic/metal

The lens uses metal components for the focusing helical, plastic for the internal block that includes the aperture mechanism and carries the lens elements and a mixture of metal and plastic parts for the focus and aperture controls and front cover and dress ring. This is mostly the same in both lens versions except the focus ring on the MM version is metal but plastic on the AE version. The AE version I had showed why this change was probably made - it had cracks in the plastic around the screws that attach the ring to the focusing mechanism. This had caused the focusing ring to become loose and allowed the focusing helical to separate - which is how I came to have the lens. I have seen some cracks like this before so is clearly a potential issue.


Focus guides

Lenses of this general construction usually have one or more guides that allow the focus helical to move back and forth but stopping it from rotating. If these guides, or the slots they move in, become worn, slop or backlash can appear in the focus mechanism. Many lenses have one of the guides split so that its width can be adjusted to take up any excess. The AE version didn't have a split guide while the MM version did.


The slot in the helical component was also different in cross section which means the guide only contacts the helical at the edges in the MM version. What difference this would make I don't know.


Lens mount

The construction of the lens mount is completely different on these two lenses but I think the mount changed before the MM lenses were introduced so this isn't a AE/MM difference as such. The mount, of course, works in exactly the same way but the parts and their assembly is different.

I guess the question has to be, if the differences are so small, why is one lens suited to MM mode cameras and the other not. There may be other differences between the aperture mechanisms that are not really visible. The small constructional differences I could see between the two assemblies were not worth mentioning but maybe they do have some significance. The basic operation of both look identical.

Edit: I have, of course, passed over the infamous 'ninja star' aperture shape of the AE lenses. This is minimal on the 50/1.7 but it is present and shows the shape of the aperture leaves on the two lenses are different.