Due to a number of spam comments that have been made recently, all comments on this blog are now moderated which means they will be checked for content prior to being approved. So, to the spammers, don't bother because you will be wasting your time posting comments here.
Wednesday, 23 July 2025
Sunday, 5 January 2025
Contax S2 shutter adjustment
I was reminded recently of a post I made, some years ago, on Rangefinder Forum describing the adjustment of the Nikon FM2 shutter (later used in the S2). I thought posting it here might be a good idea. It's been edited from the original to remove the Nikon references and change a few specifics based on more recent experience.
Note: Some of the pictures are of other, similar, shutters so may not be exactly as the S2 shutter but they serve to show specific features.
The S2 shutter is a mechanical shutter with speeds from 1 sec. to 1/4000 sec. plus B. The shutter was made by Copal and is a variant of the Copal square shutter.
The shutter curtains are timed by a cam rotating around a shaft driven by a spring. The spring has a small amount of adjustment to its tension. The position of the cam at which the second curtain is released is fixed but the position at which the first curtain is released is moved when changing speeds. This is the only method used to adjust between the top four speeds (1/500 - 1/4000 sec.). slower speeds use an escapement and a number of linkages to hinder the rotation of the cam and so decrease the shutter speed. The two curtains are driven by individual springs each with its own tensioner. Once the curtains are released, they travel independently and have no interaction.
As mentioned, the main spring has some adjustment which will cause the main shaft to rotate more or less quickly. This affects all shutter speeds but the affect is mostly to the slow speeds with minimal affect to the high speeds.
There is an adjustment that alters the timing between the release of the first and second curtains. This affects the high speeds with no affect to the slow speeds.
The curtain tensions can also be altered to increase or decrease the travel time but this isn't recommended.
Adjustments can be made with the shutter in-situ but the high speed adjustment is easier with the shutter removed from the camera. Note that the mirror box of the camera needs to be removed to access the high speed adjustment.
Image 1 shows the main operating levers that cock and trip the shutter.

Image 2 shows the location of the adjustments.

Image 3 shows the location of the curtain springs and the slow speed escapement.

Check all the speeds before making any adjustments. Only adjust what is necessary which is usually just the high speeds.
If you need to, adjust the slow speeds first then the high speeds. Note that this is a mechanical shutter and the speeds will not be perfect. It's quite typical for the top speed to be a little slow. All the speeds should be checked after each adjustment and some compromise may be necessary to get all speeds to within acceptable limits. Note that the 1/250th always runs slow to ensure flash synchronisation is acquired.
The main shaft has a disk attached to the top with a number of slots in it. The end of the main spring sits in one of these slots. See image 4. To adjust the slow speeds, move the end of the main spring to a different slot to either increase or decrease the tension as required. I've found the fingers forming the slots get pinched together by the factory to stop the spring end from slipping out so the fingers need straightening first to allow the spring to be moved. A flat bladed screwdriver pushed between the fingers usually does it. BEFORE moving the spring, wedge the tip of a screwdriver behind the spring end so that, if it slips out of the slot or you lose your grip on it, it won't fully unwind.

Note: The disk on the top of the main shaft that has the slots in it has a slotted hole that fits over a matching raised part on the end of the shaft. In theory, it would be possible to remove the disk and refit it turned by 180 degrees. See image 5. This would allow the spring to be tensioned an extra half-turn. I've never had to do that but if a spring was particularly weak, it might be a solution. The screw holding the disk in place is left hand threaded so turn clockwise to unscrew.

To adjust the high speeds, identify the high speed adjuster. See image below. It looks like the head of a screw with a slot in it but it's only visible side-on and the slot may not be facing you so may not be visible. Because it's not possible to engage a screwdriver in the slot in the normal way, it's necessary to use the tip of a flat bladed screwdriver pushed sideways into the slot to turn it.

If the slot isn't facing you then you need a screwdriver with the tip bent 90 degrees to get into the slot. Note that, usually, only a very small movement is required.

Just to reiterate, check all the high speeds after adjusting the high speed adjuster and check all the slow speeds after adjusting the main spring as a compromise may need to be made. The below image shows the typical speeds after adjustment. I fire the shutter multiple times at each speed and plot the highest and lowest values to check for consistency. This was a good shutter - you may not get the speeds this close to ideal. But they should be within the upper and lower limits (red and green lines). Note that 1/250th (flash sync speed) has it's tolerance all on the over-exposure side because, if it runs high (under-exposure) then cut-off may happen when using flash.

Monday, 6 March 2023
Body Caps
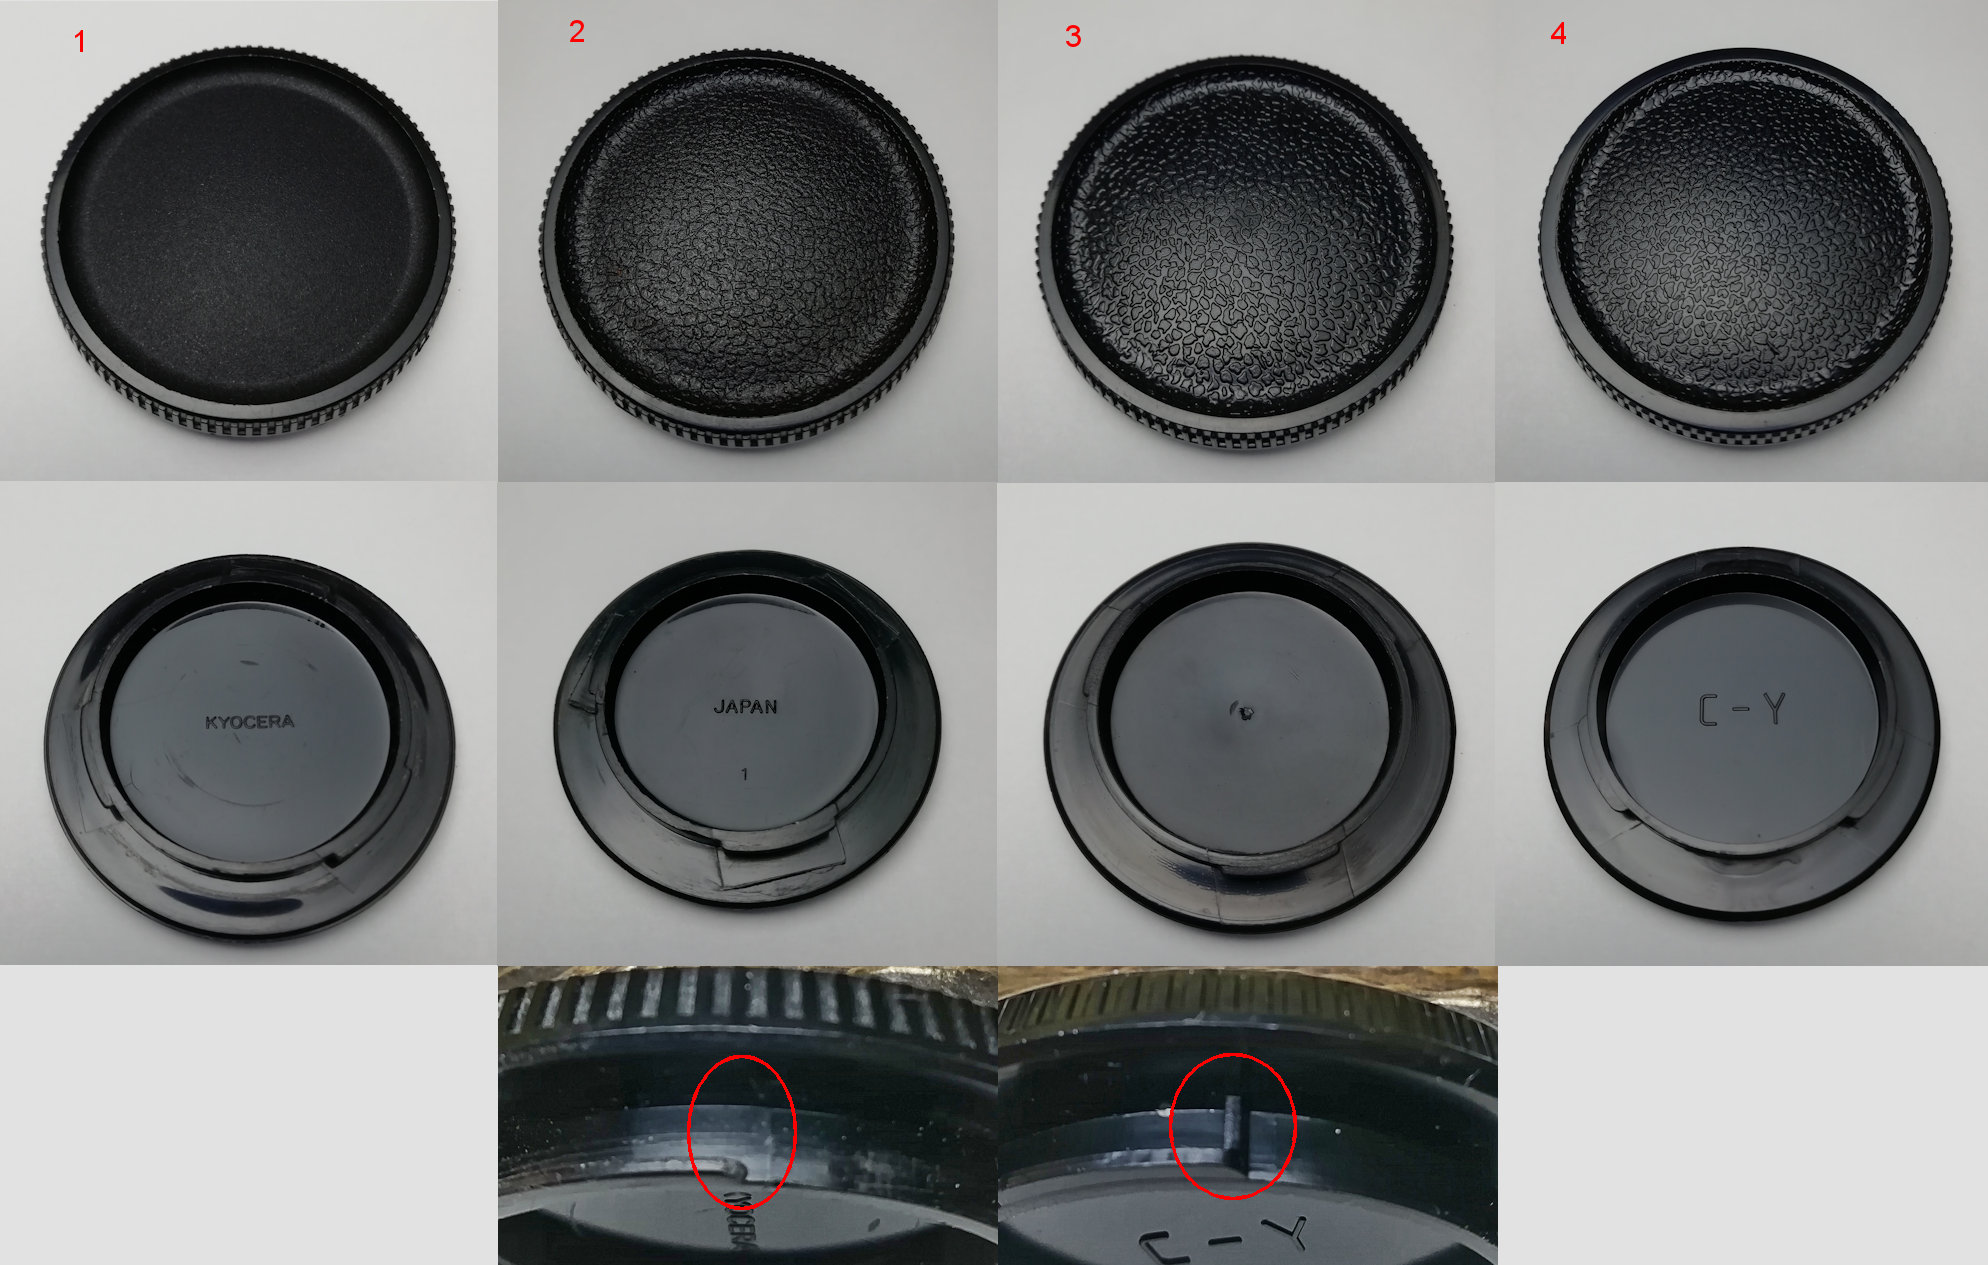
Who knew body caps could be so interesting? I noticed I had four different types of body caps. They are:
1. From a later, Kyocera made, body.
2. From an early, Yashica made, body.
3. From an Aria but not sure if it's original to the camera or not.
4. A (Chinese made?) after market cap.
Besides the differences in the patterning on the front and the text on the back, the way the bayonet is moulded is different on no. 4 to the other three. No. 4 has an extra bit that prevents the cap from fitting properly - it shouldn't be there and I always cut it out when I buy them.
I know 1 and 2 are original equipment, I know 4 isn't. Not sure about 3 though.
Friday, 16 September 2022
My S2 - it's a keeper
I bought this S2 a while ago - someone had squirted oil into the shutter and had removed and refitted the focus screen incorrectly which caused other problems. I couldn't save the shutter so it was replaced and various other repairs carried out. The interesting thing (to me anyway) is this example has been converted to have average metering like the S2b instead of spot metering. The mask that defines the spot area has been swapped for the mask that is normally in the S2b. Maybe the masks were swapped between a S2b and this S2 or maybe it was done when spare parts were still available and someone acquired and fitted the S2b mask. However it was done, it suits me as I've never liked the spot metering. So I think this one's a keeper.
The covers I've fitted are some fabric covers I'm experimenting with. Also available in blue and black if anyone is interested.


Monday, 22 November 2021
Shutter speeds - before and after service
An example of the difference a service can make to the shutter speeds of a camera - in this case, an RTS II.
Shutter speeds before service:
Shutter speeds after service:

And, although not the sole reason for the slow shutter speeds, this is the dirt, on the end of a slip of paper, removed from the shutter magnet which can cause the magnet to be slow in releasing the second curtain and cause the shutter speeds to be slow and, often, more erratic.

Sunday, 8 August 2021
Replacing the 159 focus screen
The 159 focus screen is not considered user replaceable despite it being fairly easy to remove. The problem is refitting it. In the user manual it says the screen should only be replaced at a service centre and with good reason. If not done correctly the screen will, almost certainly, be damaged. I know, I've done it.
I experimented with an old screen to see if I could find a way the screen could be changed without damaging it. Described here is my method found through that experimentation, it's not a manufacturer recommended way.
Before proceeding a method of holding the screen without damaging it is necessary. Later camera models had screens with a tab to be used to hold the screen by but the 159 screen doesn't have a tab. I use a pair of flat tipped tweezers that have had the tips covered in heat shrink cable insulation. This is permanent and I only use them for this purpose but a temporary solution could be some rubber sleeving fitted over the end of some tweezers.


I also recommend the mirror buffer foam be removed. This makes it easy to see the release catch.
First, the camera needs to held inverted.

A piece of card needs to be cut and bent to fit into the camera such that the edge sits against the back of the focus screen frame (see arrow in next picture). The card will stop the frame jumping out of its retaining slot and will also protect the mirror from possible scratching.

Release the screen by pulling back on the catch. The screen frame will pop up. Lift it up and remove the screen from underneath. This is best done by using something with a point to press against the edge of the screen and lift it up then use the covered tweezers to grab the screen and remove it while holding the frame clear. Don't try and remove the frame first, you will probably scratch the screen while trying to remove the frame.
If you do remove the frame after removing the screen, note it has two tabs on it, a wide one on one side and a narrow one on the other, The wide ones goes to the back, the narrow one to the front.

Refitting is the reverse order to the above. Fit the frame first, hold it clear and fit the screen under it. Note the dull (matte) side of the screen goes towards the prism.

Finally, lower the frame but DO NOT try and press down on it to engage it with the latch.
Use a pair of tweezers to pull the latch back as far as it will go. Use the tweezers against the mirror box frame and make sure the latch is held firmly before going further.

This is the most important part of the process. If the latch isn't held back the frame, which is quite flimsy, will get pushed inwards and will scratch the surface of the screen.
With the latch held back, hold the frame into position then release the latch.
This is not an easy procedure to carry out and requires practice of using two pairs of tweezers and a steady hand.
Sunday, 7 February 2021
Yashica FX-3 Super 4000 part II
Following on from my previous post of the same title. The KF-M1 lingered in pieces for a couple of months until I finally decided to convert it to a Contax/Yashica lens mount. I've converted Phenix made, Yashica based, cameras before but from Pentax K mount to C/Y. That was fairly straight forward and I expected this to be the same - I was wrong. Converting from a Nikon mount to a C/Y mount turned out to be more difficult. The main issues were due to the way the Nikon mount transfers aperture information to the body which meant the metering circuit was different and also due to the shorter flange to film distance and the wider lens mount causing some mechanical differences.
Without going into all the details, essentially, I replaced the KF-M1 mirror box and viewfinder along with the meter circuit with the same from a Yashica FX-3. The increased range of shutter speeds is a slight issue and, as it now stands, the meter doesn't work if the 1/4000 shutter speed is selected. That's not really an issue. I also added a grip, replaced the shutter speed knob as the original was difficult to grip, and fitted new covers. As I replaced the viewfinder and metering system with the same from a Yashica FX-3 Super 2000, I also gained a flash ready signal in the viewfinder though that required the hot shoe to be replaced with one with the extra flash contact.
The shutter speeds were adjusted and the 1/4000 is just within specification but it's clear this shutter is struggling to reach the 1/4000 speed. Some further adjustment might improve it but I decided to leave it as it is.
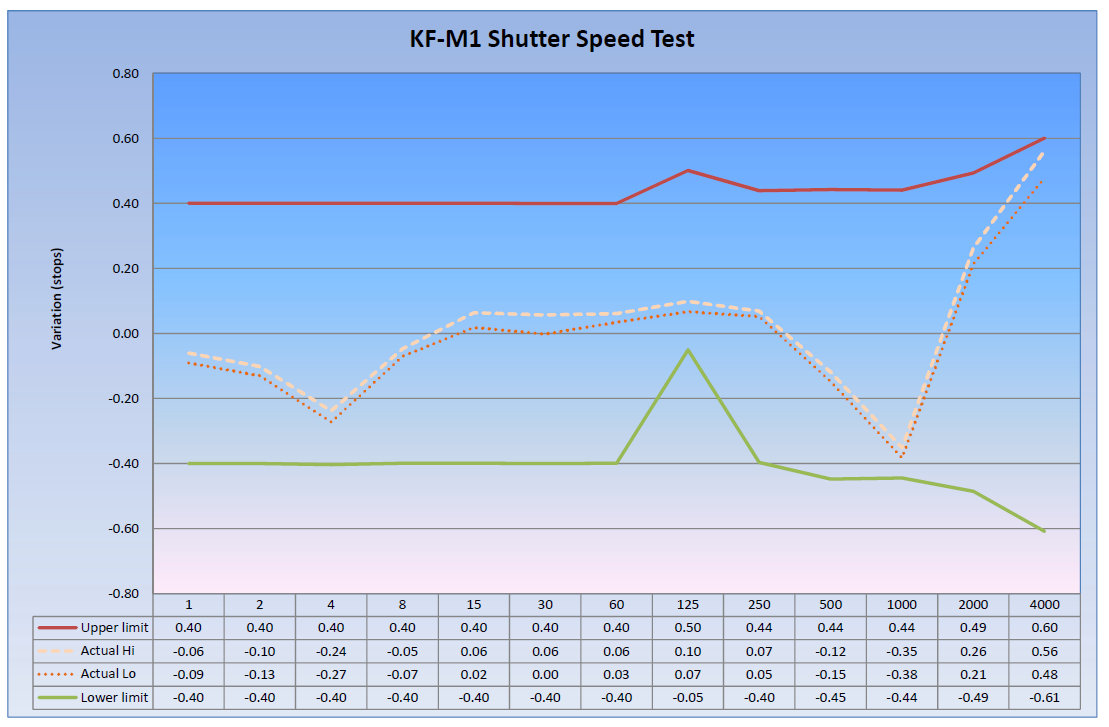
The same shutter, used in the Yashica Super 2000, but without the 1/4000 speed, exhibits almost identical characteristics and is already struggling to reach 1/2000. This isn't a match for the shutter used in the Contax S2 though, even that, can struggle to reach 1/4000.
Overall, I'm happy with the result. The camera handles well and with the increased weight of the metal top and bottom plates it feels more solid than a Yashica FX-3. Despite the fact I probably won't give it much use, I think it's a keeper.


Subscribe to:
Comments (Atom)